Monday, January 30, 2023


My best images taken with my new equipment in 2022

      Other than my new mount, I have purchased 2 new filters.  Since I am using a monochrome camera (black & white), I use specific filters between the telescope and camera sensor.  I use Red, Green and Blue filters to capture and produce an image similar to what the human eye can see, like a normal camera.  The other filters I use are Ha (Hydrogen Alpha), OIII (Oxygen III) and, SII (Sulfur II).  So if I am taking a normal colored picture I need to take 3 separate exposures.  An RGB image uses the 3 coloured filters, Red, Green and, Blue.  When I am taking narrow band images using SHO (the Hubble pallet), I use the SII, Ha, and OIII filters. This combination produces enhanced coloured pictures similar to what you've seen from the Hubble Telescope.  There are other variations of images using these filters in different combinations.  One combination I often use is HOO,  not all deep space objects emit SII light.  In producing a coloured image, I use Photoshop where I combine the individual images to produce a coloured picture.  If it's a standard image I just make Red as Red, Green as Green, and Blue as Blue.  If it's a SHO image, I make SII as Red, Ha as Green, and OIII as Blue.  A HOO images is Ha as Red, and OIII as Green and Blue.  There are other combinations as well.

     The reason for using SHO narrow-band filters is to eliminate light pollution in the sky.  With the SII, Ha, and OIII gas emissions being so faint they need much longer exposures to become visible. Taking an average RGB image I take a 120-second exposure, and with SHO narrow-band images I take 300-second exposures.  The better the filter the better the final picture.  Some of the filters I started with produced halos around bright stars,  and also allowing unwanted light through than they should, so you end up with a less sharp image.  I ended up replacing two filters, the Ha, and OIII.  I was getting coloured halos around my stars, which takes allot of time to control in processing.    

   And Now To The Pictures


IC5070 "The Pelican Nebula"  Captured Oct. 2021 using SHO filters.


IC410 "Tadpole Nebula"

     This image was captured late Dec. 2021.  I used the S H O filters taking 300sec. exposures threw each filter for a total 3 hour exposure.


The Flame and Horse head Nebula.  Captured Jan. 2022 using the  Ha, Green, and Blue filters.
This is just with the Ha filter


The Rosette Nebula.  Captured Feb. 2022 using Ha, SII, OIII filter combination.
For this image I used the filter combination of Ha, OIII, OIII


M13 "The Great Hercules Cluster" Spring 2022. This is a RGB image.

NGC6888 "The Crescent Nebula" Summer 2022. This is a HOO image.

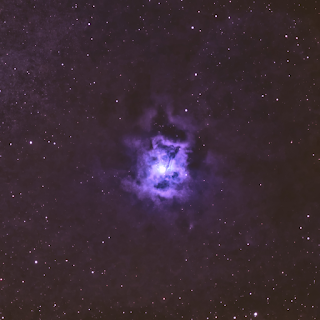
The Iris Nebula.  Summer 2022.  Captured in RGB.  The bright blue star in the center is lighting the surrounding dist in space.
 
 
The Cocoon Nebula. Fall 2022.  A very dusty patch of space. Captured using RGB filters.
 
NGC6960 "The Witches Broom" The western section of the Veil Supernova Complex.
This was captured Sept. 2022 using the Ha and OIII filters and processed in HOO.  With my new filters I was able to pull out allot of detail without a large halo around the central star.
 
"The Cygnus Wall" A section of NGC7000.  I captured this in Aug. 2022 using SHO filters.
 
 
NGC281 "The Pack Man Nebula"  Captured Fall 2022 in SHO

NGC7380 "The Wizard Nebula"  Captured Fall 2022 using SHO filters.
 
The Helix Nebula  Captured Fall 2022 
     This was captured using Ha and OIII filters.  This time in processing I wanted the nebula to appear more transparent than previous versions Ive done,  like viewing it threw a telescope. 
 

 IC63 "The Ghost of Cassiopeia"
Captured this Oct. 2022.  This time I used a Ha filter for the Red nebula and RGB filters for the stars.

The "Double Cluster" Fall 2022 in RGB


Tuesday, January 24, 2023

Better Late than Never

My New Mount


After 11 years of using a Losmandy G11 EQ mount it was time for a change. The Losmandy is a very stable and reliable mount for astrophotography and many imagers use them. For me, it just became my weakest part of my system especially after upgrading my imaging camera to the 20MP ZWO ASI183mm Pro. The Losmandy had intermittent times of great guiding at .30 arc sec., but other times it could be over 1.5 arc sec. I did all I could to tweak the mount with better worm gears and bearings but I just wanted something I didn't need to fiddle with. 

            So in the summer of 2021, I decided to do more research and track down a new mount within my limited budget. I wanted a mount with payload capabilities similar to my G-11 even though I'm using a 20lb imaging train. I am always wanting a larger scope. The summer of 2021 wasn't the best time to look for something new, with covid 19 still affecting supply chains for anything astronomy related. If I found a mount I was interested in, could I actually get my hands on it?  My dream mount was the Italian made 10micron GM1000HPS, but at $13.000+ that was out of the question.

I started researching the Sky Watcher EQ-8. At around $5000.00 it looked promising. The reviews seemed good with the exception of USB port flaws, but I figured I could work around them. Now I had to find one. I scoured the internet with no luck. Talking to a few Canadian dealers, they told me that they didn't expect any new stock until summer 2022. The 3rd mount on my list was the iOptron CEM 70. It had favorable reviews and was in my price range. The CEM 70 had a lot of great features I wanted. One thing I didn't need was a tripod,  with the mount sitting in an observatory on a permanent pier. So back to searching online.  Behold, I found one, the CEM 70G, with no tripod. It was in stock and ready for immediate shipping. The G version of this mount has its own built-in polar alignment scope and guide scope with camera.  One day later I received my packages from Ontario Telescope: The mount, with its own carrying case, the counter weight, and the pier extension kit, as recommended by the owner Steve.

Installing the mount on the existing pier was quite simple with a part from the pier extension kit. I had to drill a few holes and it was good to go. All I had to do now was to polar align the mount. The CEM 70G has a built-in polar alignment scope and camera, but it needed to be calibrated before use according to the manual. Since I already had a QHY Pole master alignment camera, I decided to go with it since it didn't need calibrating and I was familiar with its use and accuracy. The CEM 70G has a payload of 70lbs, so my 20lb imaging system is nothing for it. The feature I like most about this mount is its internal cabling system and built-in USB-3 hub. No more dangling wires. I plug in 1 USB and 12v power cable to the base of the mount and there are connectors at the base of the telescope. Nice and neat and no wire snags. 

After the mount was polar aligned it was ready to go. I did a 2 star alignment then slewed to my first object, M57. It was dead centre, perfect. To this date I haven't needed to do another star alignment. The auto guiding on this mount has been exceptional for me, .25 - .65 arc sec.  I've seen a great improvement in my images, with smaller and rounder stars. For the first month of using this mount, I used the hand controller. With the built in GPS system, it automatically calculated the proper time and location. All the functions of the mount were at my fingertips. But, after about 2 months, the hand controller lost its brains. Its internal battery had failed. The tech department at iOptron responded to my email within a few hours with a PDF on how to replace it. After doing so, the hand controller worked well again.

      Recently I decided to change how I operate the mount.  Everything is now computer controlled and operated from my PC in the observatory or from the house. This opens up many possibilities, like automatically running a full night of imaging while I'm sleeping. I haven't tried this yet because I still like being out in the Observatory keeping an eye on things.

            Overall I highly recommend this mount. I've been using the CEM70G in my observatory for 16 months. It does what its supposed to do very well. Hopefully one day, I'll be able to test it with a much heavier telescope.

P.S.  Even though I have many opinions on the equipment I own, this is my first actual written review.  I hope to have more in the future.  (All of these opinions and comments are my own)

Glen Pidsadnick  


The Losmandy G-11 Setup I have used for years

Ready to move on to a new home

 
The Pier Ready for the new mount with the adapter plate installed

 The new mount on top of It's new perch
 
Back of the CEM70G with all It's handy connections


The new mount loaded up and ready to go


Wednesday, September 22, 2021

I upgraded my camera


     Well it hasn't been the best summer for astro imaging with all the forest-fire smoke and clouds but I did manage to get some good images captured.  I decided to upgrade my imaging camera from a 2mp. ZWO ASI290MM Cool to the 20mp. ZWO ASI183MM-Pro. What a difference 18mp. can make.  Now I am able to capture wider field images which gives me the opportunity to image larger objects.  My 290 was a great starter mono camera which was easy to use and was great for learning R.G.B monochrome processing.  This new 183 camera has 2.4 micron pixels which are smaller than the 2.9 of the older 290.  This still makes it suitable for lunar, solar, and planitary as well as deepsky imaging.  

The New Camera along with its Specs.


     The Images below were captured from my BackYard Observatory in Sherkston On.  I'm still using my Tele Vue NP101 APO refactor supported by a Losmandy G11 Equatorial mount.  Also a ZWO EFW  7 position filter wheel holding Optolong 1.25" LRGB and SHO filters and the ZWO EAF. 
All image processing was accomplished using Deep Sky Staker and Photoshop CC 2021.
M20, the Trifid Nebula.  Captured using RGB filters.


NGC6995 The Eastern Veil Nebula, Captured in HOO (Ha,OIII,OIII)

The center section of the Veil Nebula complex named Pickering's Triangle in HOO

NGC6960 The Western Veil known as the Witches Broom in HOO

IC1396 The Elephant Trunk in SHO (SII,Ha,OIII)
IC5070 The Pelican Nebula. This is a monochrome image captured in Ha. After processing I colorized it red.

Next time "My New Mount"


Monday, June 21, 2021

 Galaxy Season 2021

 It's been a very busy imaging season this year. I am happy with the results of my work.  All these Galaxy images where captured with my ZWO ASI290MM Cooled camera.  It was attached to a Tele Vue NP101 f5.4 APO refractor.  My mount is a Losmandy G11 with Gemini 1 Goto controller.  I use a ZWO EAF running the Moonlite focuser and a ZWO 8 position EFW. 

All the images where aquired with Sharpcap.  Deep Sky Stacker was used for image calibration and  stacking. Photoshop CC2021 was used in image processing.  

On average I captured these images the same way.  Taking 120 to 180sec. frames in Red, Green, and Blue with a gain of 120 to 300. I would capture 20 frames of each colour, along with Darks and Flats.


Here are my results.


NGC4656 The Hockey stick

NGC4631 The Whale & Pup
 
M104 The Sombrero Galaxy

M64 The Black eye Galaxy  (monochrome image)

M63 The Sunflower Galaxy

M51 The Whirlpool Galaxy

Tuesday, January 5, 2021

R.G.B. Season

     Sorry it's been a while since I've posted any images but I have plenty today.  I spent most of my time imaging the planets.  Capturing them in RGB  had a bit of a learning curve, in capturing techniques and processing.  Basically 3 times the work.  There are plenty of great tutorials on line to help as well as great free software.  I used many programs, Firecapture for Image capture and filter control, PIPP for image stabilization,  Autostakkert for Video stacking, RegiStax 6 for Wavelet sharpening, and Photoshop CC 2020 for final processing.  All images where captured using a ZWOASI290mmc camera on a Tele Vue NP101 telescope.  For the planets I used an Antaries 3x barlow.

 Mars


Jupiter


Saturn
Lunar


Ha Solar Lunt LS60THa


White Light Solar


Deep Sky